Sunday, 24 June 2012

Brush Type 2 exhausts

A long time ago I started to 'upgrade' a Triang Brush Type 2 ('class 30, 31') and got so far with it - then either got fed up, sidetracked, or otherwise and never finished it.
I found it today in a box and thoughts are turning to doing something with it now. I did lots of research back then but have forgotten most of what I learnt so am starting again.
I always had a feeling that when the Type 2's were re-engined from Mirrlees to English Electric units, that the exhaust ports on the roof got altered, but I could never find any conclusive proof. Over the years I've bought many books and mags with '31's' in, so I dug them all out and went through them all, along with a lot of photos I'd bought. 
Sure enough I found two pictures to prove the exhausts were different. This montage pic shows the difference:
 

Mirrlees above, EE below- the latter narrower and wider, and although not obvious in this shot, mounted on a plate which covered where the Mirrlees one was previously.

 The Triang model, given when it was released- much the same time as when the real thing was introduced, is meant to depict the Mirrlees exhaust layout, though they didnt quite get it right, the hole where the smoke comes out should be offset, plus it's pretty 'flat', it should stand quite proud of the roof.
Quite an easy task to put it right,as I want a model in 'as built' condition.I think some of the central 'walkway' ribbing on the roof isn't quite right in places (need to study more photos) but on the whole the roof is pretty accurate.

Thursday, 21 June 2012

COUPLERS

About ten years ago I built quite a few 3mm Society plastic wagon kits, but never got as far as fitting the Triang style tension lock couplings. Now I've got some modelling time, and after a major reorganization and tidy up, I unearthed all those never finished kits.

I started on a box of PP43's (BR 12ton van,plywood sides) then remembered just why I probably didn't finish them ages ago. If you just glue the bar (which the coupling fits onto) behind the headstock on the wagon, the coupling height is wrong. I don't think I ever worked out what needed to be done to correct this back then, but after a bit of measuring with the digital vernier I worked out, on this wagon at least, there needs to be a 0.5mm packing piece between the bottom of the van floor, and the bar the coupling fits onto.

I altered the first one, fitted the couplings and put it behind a Triang 31 on the track. Except it wouldn't fit on the track- because when I made these wagons I intended to do 14.2 finescale, but have since changed my mind and do 12mm now. A quick re-gauge of the wheels and the 31 was happily trundling its way around the 'layout' along with a couple of Conflats. 

Now I've got the space and the time, what was originally going to be the layout along one wall (12.5 feet long, and 27 inches wide) will probably end up going around all the walls of the room. For now a double track  dog-bone scheme will have to do - at least I've got something to run trains on instead of always building stuff and never seeing any action!


Monday, 11 June 2012

MAROON, MAROON, OR MAROON

Will the real Maroon please stand up. This shot taken at Loughborough on the GCR, shows three Mk1 coaches all painted in different shades of BR Maroon. Long time painted ones are a much deeper 'blackberry' shade, whereas more recent paintjobs are a distinctly lighter more 'cherry' colour. Mischievous people might say they are the same shade as they use for their 'crimson' on the red and cream repaints....
But, these different shades of maroon are probably only reflecting how it was 50 years ago;
consult any book with colour shots taken back then and you will find quite an array of maroons,  ranging from very 'pink' shades, through 'browns' to virtually 'purples'. Obviously on some shots the passage of time has affected the negatives/slides, and the various makes of film recorded colours differently; even so you cannot argue when you can see several dinstinctly different shades in a rake in the same shot. I think this goes to show, despite official instructions, that the colour of maroon varied from BR Works to BR Works, and also from outside contractors.
So I suppose it means you can paint your models in any old shade of maroon (Humbrol 19, even?) and get away with it!


It doesn't only happen at Loughborough, you can find different shades  being used at Shackerstone

Here 4939 is behind Griddle Car 1104, which although faded is quite a different shade.

When it comes to model paints, those which were/are available as BR Maroon (Cherry,Southern Pride,Phoenix,Railmatch) were all virtually identical, being the darker 'blackberry' shade;  Bachmann Mk1's dont match up, and curiously the shade Lima used is very close to the shade you see in the vast majority of colour pictures- they obviously went ot a lot of trouble to try and get it what they thought was 'right'.

Saturday, 9 June 2012

Another Kitmaster conversion

Also featured in a 1960's Model Railway Constructor was a set of plans for the Southern Region's 4TC trailer sets,which  usually ran  in conjunction with a Class 33 loco. Missing out on green livery, the 4TC's were some of the first things to appear in allover 'semi-matt' early BR Blue livery, which was quite a few shades different (lighter) than the later colour used - a much deeper green/blue shade - although it soon weathered down to look more blue like.
Recalling the class 309 Clacton Express EMU's were uniquely painted in maroon coaching stock livery, I remembered seeing a 'preserved' 4TC set at The Midland Railway Centre at Butterley last year, also in maroon livery. A bit of research revealed it wasn't just preservationists 'wishful thinking'  which resulted in the unit being painted this colour, but that it had been used in some capacity on London Underground (probably specials, tours etc) and it was meant to be in the London Metropolitan Railway maroon scheme.
The 4TC (and earlier short-lived 3TC sets) are more possibilities for Kitmaster coach conversions; A relatively straightforward job with again the most work needed on the driving cars; These cars had the later  smoother cab ends and didnt look quite so 'utilitarian' as those that had been built previously. 

4TC set DTSO no. 76298


Thursday, 7 June 2012

A challenge

This would be quite a challenge- a 3mm model of BR Mk1 3083, one of the experimental coaches, with lots of small side windows. Resident on the Severn Valley Railway, it has variously carried red & cream, chocolate & cream, 'fake' varnished LNER teak, and nowadays BR Maroon. Despite a quite recent repaint is doesnt seem to get used very often, along with 1883 the 'Bar' coach.

Seen here at last years diesel gala, being hauled by 'Slug 6'  (37906)  uncharacteristically not blotting out Kidderminster with clouds of black smoke (not that there's anything wrong with that....)


A couple of unlikely pairings hauling trains could also be seen: 14 and 42
and double headed 08's....

The 3mm Society

A timely reminder about the 3mm Society.
Founded in 1965 to cater for all those modelling in 3mm scale, from Triang TT to the scratchbuilder. Well worth the membership fee, indeed some would say worth the money for the excellent Society Magazine alone.


Considered by many to be the ideal scale, it is just unfortunate that there is no current British prototype ready-to-run trade support. Those who lack space for 'OO' gauge, and find 'N' gauge too small often turn to 3mm, especially the active modeller who is not afraid of,and is prepared to 'have a go' at, making kits and scratchbuilding things.

You could have a train running around in no time using secondhand Triang TT stock, just to get you started and keep the interest up until you get up and running properly. In a couple of weeks you could have a rake of Society wagon kits trundling around behind a Jinty or a class 31.

Visit the world of 3mm at the Society Website:

Also for those interested in 3mm: 
Worsley Works, 600 etched kits in 3mm also Loco kits

3SMR, vast range of 3mm products

Finney & Smith, many ueful bits and pieces,
plenty of kits including Judith Edge BR Shunters
http://finneyandsmith.co.uk/finneyandsmith/index.htm

Wednesday, 6 June 2012

BRUCE SMETHAM CLASS 37

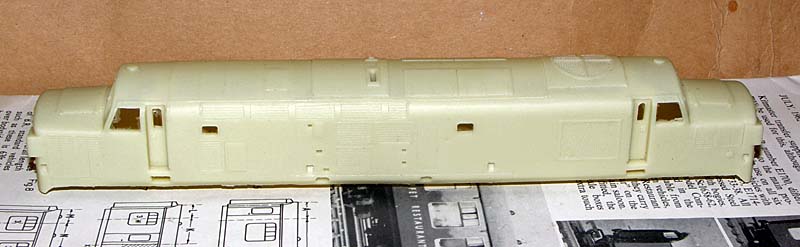
Managed to miss the Postman just before the bank holiday, he left a card saying there was a 'Tube' to collect. I couldn't think what it was so collected it today (the earliest after the holiday I could).  A nice surprise when I got it, my eagerly awaited Bruce Smetham Class 37. I'd seen the Plastikard master for this model at the Kingsbury meeting a few months ago, and ordered one straight away. They were ready at the AGM, but I didn't make it this year, so Bruce kindly posted it on to me.

It's a one piece body cast in cream Polyurethane resin, with extra castings in resin for the fuel tanks, and in white metal for bogie cab steps, bogie sideframes and OLEO buffers.

The body represents the first series of class 37 as built, with split headcode boxes and buffer fairings, the centre headcode version of this model will appear later.


As can be seen it's quite a faithful representation of the prototype with all the essential detail there. The various contours and shapes, of which there are many difficult ones to capture on a 37 are very well done. The tumblehome at the bottom of the bodyside being particularly hard to get right given it starts to change profile just under the cab door steps, becoming vertical at the nose ends.

Motorization is possible using one of the Co-Co etched brass chassis kits available via the Society shop, though no doubt there are other ways of doing it.

All in all the best 3mm class 37 to date and very good value for money.


Sunday, 3 June 2012

Mk.1 COACH ROOF VENTS

Modellers of Mk1 based stock will find at least three different types of roof vent that were used. These were (L-R) the Shell, Scallop, and Ridged Dome varieties illustrated here:


In 3mm scale it would appear that no one makes a 'scallop' type, which is a shame as there are a heck of a lot of them used on Mk1s.

Fortunately the Prototype 4CEP units seem to have used mainly the Ridged Dome type.
An example of one of these can be seen in this pic:


4CEP ROOF DETAIL

Gathering ideas together of my own and other members of the 3mm Society, I did a trial of different combinations of materials to represent the roof conduit/wiring and associated fixings found on the roofs of the cars of a prototype 4CEP unit.


Top is a 16BA flat washer, with a Markits N gauge handrail knob, with 0.47mm  brass wire;
Next is a 2.3mm plastic card disc (15 thou) with Slaters plastikard rod, drilled to take 10 thou Plastruct plastic rod;
Then, a 2.3mm disc (15 thou) with Slaters plastikard rod drilled to take Plastruct  20 thou plastic rod; Finally 2.3mm disc (15 thou) , Slaters Plastikard rod drilled to take brass 0.4mm  wire. The ridged dome roof vent  gives something to compare against to gauge which one looks about right. It's easy sometimes to make something which is very small, too big without realising it.  I think I prefer the bottom one, although the 2.3mm disc will need to be a smaller diameter still ( havent got that far yet...)


despite being N gauge the handrail knob looks way too big!  

Limonene

In the past I've had difficulty successfully gluing largish areas of thin ( 5 or 10 thou) plastikard together. Using something like Plastic Weld, it evaporate so quickly, capilliary action is minimal, with quite a bit of the surfaces to be joined not being reached by the glue. Continuous applications trying to get the glue to penetrate usually end up with a stick gooey mess which wrinkles up. Other brands like MaGer and MekPak aren't quite so thin, still evaporate too quickly and are a bit too powerful to use with larger areas of thin plastikard.
By chance the other day whilst searching for something else, I came across a product I'd not heard of before 'Limonene'. Described as a mild solvent, it looks like it could be useful.
Painting it on it stays wet, so you should be able to paint one or both surfaces of the card and join them together before it starts to disappear. It works very slowly gently melting the surfaces together. With this in mind you might need to clamp things on curved surfaces while it sets. I'm looking forward to trying it out properly. It's got a really strong fruity smell too, the cats werent too impressed!
One thing though, that damned child proof top has got to go. I always get rid of them on solvent bottles, as you really need to keep putting the top back on to stop the glue evaporating away (especially in warm weather). These tops are just a nuisance.

Beware Limonene is not cheap -  £6.00 (UKP) for 100ml, I got mine from Hobby Holidays in Doncaster
(by post).

http://www.hobbyholidays.co.uk/proddetail.php?prod=LIMONENE


Friday, 1 June 2012

CUSTOM SANDERS

Workers in small modelling scales often come across situations where something needs to be sanded, but a needle file is too big risking damage to unwanted areas, and trying to use wet and dry paper in very confined or localized areas is very difficult.
Making a custom sander to suit your specific situation is one answer. Using anything handy, a strip of wood, or plastic cut to size and shape, just superglue on a piece of wet and dry paper whichever grade is appropriate to the job and away you go. When the w'n'd is worn out just glue another bit over the top.
I made this one using an old plastic paintbrush handle, with 400 grade paper on the end:


Now I can gently sand away those door bangers mentioned in the last post, so they protrude just the right amount (it's too difficult getting them right just by eye) , without damaging the bodyside.


4CEP CAB ENDS

The cab end of the 4CEP is really just the same as a Mk1 coach, but with windows cut into it and a lot of multiple connections etc added. So following real practice I did the same with the Kitmaster coach end. First I filed off all the moulded on steps and toilet water filler pipes. The bufferbeam needed a bit adding at the base to get the right shape. I decided not to use the original Kitmaster corridor connector as it didnt realy look the part, and made my own from laminations of plastic card, shaped/drilled out where necessary. I think it might look a bit 'chunky' but when you look at the end of these units the corridor connector really stands out as 'spoiling' the looks of the end, unavoidable though that is. 
It might be worthwhile making moulds from these parts to save making all the others individually; perhaps even the whole cab end with the inner plate attached, and the bellows as a seperate item.

The other end of the driving car will have the buffers themselves removed and the  area 'plated over' as buffers are not carried within cars on a unit, just the driving ends.


still a bit of shaping at the base of the outer layer (right) to do


route number boxstill  to make, and the buffer spacings need to be corrected. The last bit to add after assembly will be the flexible part that goes over the top edge. As the bodysides overlap the edges of the cab ends, the  gap between the edge of the window and bodyside will become correct

THE LITTLE DETAILS

I'm hoping to incorporate as much detail as is practical on my 3mm 4CEP model. Bodyside handrails are more than possible - Phil Parker has got them on his Kitmaster Mk1s on FLOCKBURGH , but I wondered if door handles and door bangers could be modelled.Encouraged by tips and advice from other   3mm Society  members I decided to have a go.
I found a packet of  Markits  4mm scale 'T' door handles (ref M4CDHb) , which dont look too out of scale,and for the bangers I drilled 0.5mm holes, fitted plastic rod (Plastruct ref: MR20) standing just proud, then drilled that 0.25mm and fitted more rod (Plastruct ref: MR10) standing proud again- this would be the rubber buffer part.

0.5mm rod fitted, next step drill out 0.25mm and fit more rod


a finished trial door banger. a coat of paint hides many sins. The centre part needs trimming back some more though


Doing this will be good practice for all the roof detail that will need to be added to all four cars- they all have the external lighting conduit/wiring.

door bangers on Mk.1 SO E4550, on the Severn Valley Railway


Thursday, 31 May 2012

ANOTHER KITMASTER TT MK.1 CONVERSION

Another conversion purchased from the 3mm Society secondhand sales stall some time ago.
It appears that two BSK kits have been cobbled together to form a BG. Roof, floor and Underframe trussing are shortened accordingly as the real BG was built on the shorter 57' underframe.
Ex BR MK1 BG running as part of the Cromwell Pullman dining rake at the GCR,Loughborough


As can be seen, this conversion has been painted in an almost Malachite colour, too light to represent BR SR coaching stock/EMU green. Nevertheless quite convincing with only a slight discepancy in the spacing of the various windows and doors.
Notice a couple of roof vents have been replaced by 3mm Society cast white metal ones, to try them out.

JOINING KITMASTER Mk.1 COACH SIDE SECTIONS

I soon realized when making the sides up for the 4CEP DMBSO, I couldn't file something straight to save my life, no matter how hard I tried. Getting the mating faces perfect of the pieces to be joined  to get a strong glued join was proving difficult.  I needed some sort of jig that would keep the bodyside still and square with some way of controlling a sanding action. After a lot of thought, and seeing what I'd got lying around to save buying anything, I found an offcut of 19mm MDF with a perfect square corner. I cut it down so it was square in size and slightly longer each way than the length of a Kitmaster coach side.

Next I glued onto the top edge a piece of aluminium angle (overlapping underneath the board), which would act as a 'fence'. Another piece of angle was glued on the right hand side for the sliding sander to move along. The sliding sander itself was another piece of angle, but with the face of it covered in wet and dry paper fixed to it with double sided tape, with the bottom edge of the w-n-d level or very slightly above with the top edge of the MDF board, to stop it sanding away. The pics will show whats what.

BIG ENOUGH TO ACCEPT THE LONGEST COACH SIDE IN 3MM

ONLY GENTLE PRESSURE NEEDED ON THE PIECE BEING SANDED


NO LIMIT TO HOW MANY SLIDING SANDERS YOU COULD MAKE FOR DIFFERENT JOBS


FIXED WITH DOUBLE SIDED TAPE. REGULARLY CLEAN PAPER FACE USING A TOOTHBRUSH TO STOP CLOGGING
 The only thing to keep in mind is to make sure when using the sliding sander that you keep it pressed against the angle on the edge of the board. With hindsight,this would probably have been better 'U' shaped, sliding in a 'U' shaped channel, but you might need some sort of handle then to hold onto.Also you need to keep the slider and the channel free from sanding swarf. 

Obviously there's no limit to how many sliding sander you can have, you could have a longer one, or others with different grades of sandpaper fitted.

Now it's by no means a perfect job, but it works and I can join together coach side pieces quickly and strongly, though I still add a thin strengthening piece of card behind each join for extra rigidity. The beauty of the perfect join only becomes apparent when you come to the painting!

It will also  come in useful for making items which need to have perfect 90 degree angles.

And needless to say some weeks after making it I by chance found out that NorthWest Short Lines in America make a similar  contraption, though as far as I can see none of their UK distributors stock it. Click this link below to see it

 NWSL True Sander

Wednesday, 30 May 2012

KITMASTER TT MK.1 COACH WINDOWS & THE 4CEP

The four TT MK.1 coach kits produced by Kitmaster were for the SK, CK, BSK and RFO. Disregarding door windows, they all use only two of the sizes of window that could be found on a Mk1, namely the full height 4'0" wide and 2'3" wide ones.
On other coach variants, including those used as a basis for various EMU's, there were other sizes.
From my researches it appears there were full height 1'3" (nominally) windows to be found on Boat Second, some FO, many Catering cars and quite a few EMU's; (there may be an even narrower size used on some Griddle cars- I cant confirm as yet).
Full height 2'0" wide windows were used on many Catering cars; Half height 3'0" wide and also 4'0" wide were utilized on Catering cars also.

The 4CEP has a door in the middle seating bay of the DMBSO, making the use of a 1'3" wide window either side necessary. The problem was overcome by Alan Williams in his MRC article, by cutting bits of bodyside so that you got the edge of one side of the window, but it seems the other edge was just a straight cut, not the side of window, so it looked a bit odd. He filed down larger windows to make the narrow width ones required. No doubt he had to do it like that or he may have had to cut up even more coaches than was really necessary to get the exact bits that were right.

In 3mm I'd got lots of battered or broken Mk1s, so I had the luxury of being able to use two proper 'halfs' of a window which when joined looked ok, with radii on all corners. Whilst I could file a window down to the right width, other than extremely accurate cutting how could I get the window aperture the exact width so the window was a good fit?

I decided to glue down the filed down window to a piece of plastic card, then keep filing either side of the two pieces of coach side until the two joined together nicely. How to file the sides accurately and squarely was another problem, see this post:
http://twotonegreen.blogspot.co.uk/2012/05/joining-kitmaster-mk1-coach-side.html

Odd sized window creation, first glue the filed down template to a piece of card

You need to make a diagram beforehand with all your dimensions and window positions to get things right before starting; really this is to get the spacings between windows, doors etc correct.

keep filing the two sides down by the same amount until they meet the edges of the window template
Once happy with the fit, glue with MekPak and leave to set hard. Then glue say 15 though strengthener strip on the inside above and below the aperture, leaving enough room for the window to be glued in.

Below are the templates for all the different sizes. I found that when using half height windows, I had to glue several 'plain' bodyside pieces together and drill out the apertures to take the windows. I have in mind casting a plain section of bodyside for situations like this (a lot of Catering cars have big areas of blank bodyside with occasional half height windows) rather than cutting up too many coaches to get 'plain' pieces.
different sizes found on Mk1 coaches

I went to the trouble of making all the different sized templates even though theyre not all used on the 4CEP;
thinking ahead, my Mk.1 Catering car fetish will ensure they will be made use of!


STRANGE SOUTHERN EMU

About a decade ago at a 3mm Society meeting, my curiosity got the better of me and I picked up a model of a BR Southern Region green liveried EMU driving car (from the secondhand sales stall), which had been cobbled together from various bits of Kitmaster TT Mk.1 coaches. There was no motor bogie (you could see where it had been though) and it came with no interior.

Looking a bit long, and sitting on temporary bogies.
I never really looked at it properly back then, and it got stuffed in a box and forgotten about until recently, when my interest in 3mm modelling returned after quite a while.
Studying this model I was a bit confused. It seemed overly long, a quick offering up against a Kitmaster Mk1 revealed it was about 20mm (3/4") longer. The roof had been extended, and I wondered where the extra length came from.
4CEP


4CEP

I didn't really recognize what it was supposed to be other than it was one of the BR Mk.1 based designs. Noting the car number (S 61369) and the set number on the end (7155) I consulted my refs and books and came up with the model was apparently meant to be a '4CEP' (Class 411 in later years). Whilst the car number is right for a 4CEP, the correct set would have been 7143.

I think whoever made the model appears to have been doing it from memory, as comparison with pics of the real thing reveals the extra length of the model comes from the fact it has a rather large guards/luggage area. Quite apart from that the whole layout - windows, doors etc is wrong anyway. On the other hand the cab end is quite well done, especially the route indicator box, making use of Kitmaster parts.

4CEP DMBSO
 
It's quite possible this model conversion could date back to the 1960's, and given the fact you were unlikely to ever get any sort of Southern EMU ready to run back then, hacking up Kitmaster Mk1's was probably an easier option than scratchbuilding, especially with a little planning. 

I've been using this model as a guinea pig trying out various green paints: note also the removal of the moulded on lines on the bodyside in the pic below which makes a big difference.

Green green or green


I'd decided to keep the model in my 3mm Museum as a historical curiosity...but that wasnt the end of the story.

A visit to the Craven Arms (Salop) Model Railway Exhibition last year saw me returning home via the Severn Valley Railway at Bridgnorth. The waiting room on the platform was full of boxes of old railway mags with a sign saying 'take what you want, put a donation in the box'. So I grabbed as many Model Railway Constructors and Railway Modellers as I could carry and put a tenner in the box. Then I wished I hadnt parked the car so far away.....

Again the mags got put to one side until early this year when a major change in my circumstances saw me left with just my five cats and more time than I know what to do with.

Rifling through boxes of magazines, I came across MRC for January 1961, which had an article on converting 'OO' gauge Kitmaster Mk1 coaches into a ...... 4CEP, by Alan Williams.

January 1961 Model Railway Constructor, includes an article on 4CEP's

This got me wondering whether you could apply the principles employed in the conversion to TT scale Kitmasters.
Unearthing my box of battered secondhand Kitmasters (I've amassed about 150 over the years) I picked four donors out with a view to creating a 3mm 4CEP. Well those lucky blighters have now got 4CEP's r-t-r in 'OO' and 'N' so now it's time to perhaps create one in 'The Premier Scale'.
I am aware that a 4CEP is possible from Worsley Works parts, and I do like the crisp look of brass kits, but I've always had a great fondness for Kitmaster kits, and I prefer to work with plastic than metal wherever possible.

Original formation of the 4CEPs was DMBSO-TCK-TSK-DMBSO. As in 'OO' the trailer cars are straightforward enough, being basically the same a loco hauled CK and SK's, so it's just a case of minor alterations here and there. The biggest job is creating the Driving cars, which involves cutting up and rejoining lots of pieces of bodyside to get the correct layout.

I hope in future instalments to show how I get on, but I am sure, like everything in 3mm, it wont be particularly easy, or quick.....

I've made a start on the DMBSO's, and am currently considering how best to make all the roof detail. Of course I had to be awkward and pick one of the Prototype units (7101-4) which had all the lighting conduit/wiring fitted externally on the roof!

Here is a shot of the two DMBSO's during assembly showing all the different bits from other kits that go together to make them up, and the oddball '4CEP' above.
4CEP DMBSO sides and a Kitmaster original floor. Not finished at this point- still door and some cab windows to cut out, and some raised detail to file off.
When I decide how to motorize one of these cars, I'll probably end up making a new floor to incorporate the motor bogie.

A later shot , still door hinges, handles handrails etc to make and fit.
almost complete sides of DMBSO
 I found a rare picture of 7104 in a Bradford Barton book, painted in early allover blue with small yellow warning panel- taken in the late 60's. I'd love to have one in green and one in blue, but when I think of the amount of work involved just making one.... and then there's the 4 BEP!